Trimming Guillotine Dog Nail Clippers can be a daunting task, but with the right tools and techniques, it can become a stress-free routine for both you and your furry friend. Guillotine dog nail clippers are a popular choice among pet owners and veterinarians alike for their precision and ease of use. In this guide, we’ll walk you through the steps to effectively use guillotine-style nail clippers on your dog, ensuring a safe and comfortable experience for everyone involved.
Guillotine Dog Nail Clippers, Guillotine Dog Nail Clippers
Gather Your Supplies: Essential Tools for Trimming Your Guillotine Dog Nail Clippers
Preparing to trim your dog’s nails is much like gathering your tools before a DIY project—you want to make sure you have everything you need within arm’s reach. Here’s a checklist of supplies to gather before you begin:
1. Guillotine-Style Nail Clippers
Invest in a high-quality pair of guillotine-style nail clippers specifically designed for dogs. Look for clippers with sharp blades and comfortable handles to ensure ease of use and a clean cut.
2. Styptic Powder or Gel
Accidents can happen, especially if you accidentally cut the quick—the sensitive blood vessel inside the nail. Styptic powder or gel is a must-have for quickly stopping any bleeding that may occur.
3. Treats for Positive Reinforcement
Encourage positive behavior during nail trimming by rewarding your dog for their cooperation. Have a stash of their favorite treats on hand to offer as rewards for staying calm and cooperative.
4. Towel or Mat
Place a towel or mat on the grooming surface to provide your dog with traction and stability. This will help prevent slipping and make them feel more secure during the nail trimming session.
5. Optional: Nail File or Dremel
While guillotine clippers typically provide a clean cut, you may choose to smooth out any rough edges with a nail file or Dremel tool for a polished finish.
6. Optional: Helper
If you’re new to trimming your dog’s nails or if your pup is particularly fidgety, having an extra pair of hands to assist can be invaluable. A helper can offer support by holding your dog steady or distracting them with treats and affection.
7. Optional: Muzzle (for Safety)
For dogs who are nervous or prone to snapping during grooming procedures, a muzzle can provide an extra layer of safety for both you and your pet. Yet, it’s crucial to introduce the muzzle gradually, associating it with positive experiences, to ensure your dog feels at ease and comfortable.
Prepare Your Dog for Nail Trimming Success: Tips for a Stress-Free Grooming Session
Before diving into the nail trimming process, it’s essential to prepare your dog both mentally and physically. Taking the time to get your furry friend ready can make the experience more comfortable for them and more manageable for you. Here’s how to prepare your dog for nail trimming success:
1. Create a Calm Environment
Choose a quiet and comfortable space for grooming where your dog feels relaxed and secure. Minimize distractions and loud noises that could cause anxiety during the nail trimming session.
2. Familiarize Your Dog with Handling
Help your dog become comfortable with having their paws handled by gently touching and massaging their feet regularly. Use positive reinforcement, such as treats and praise, to associate paw handling with a positive experience.
3. Introduce the Nail Clippers
Before using the nail clippers, let your dog sniff and investigate them to familiarize themselves with the tool. This can help reduce any apprehension they may have about the clippers.
4. Practice Desensitization
Gradually introduce your dog to the sound and sensation of the nail clippers by touching them to their nails without actually clipping. Reward your dog for remaining calm and relaxed during this process.
5. Offer Treats and Affection
Throughout the preparation process, offer your dog plenty of treats and affection to reinforce positive behavior. This will help build their confidence and make them more receptive to nail trimming.
6. Stay Calm and Patient
Dogs are highly attuned to their owners’ emotions, so it’s essential to stay calm and patient during the grooming session. If you’re feeling anxious or frustrated, your dog will pick up on those feelings, making it harder for them to relax.
7. Use Gentle Restraint if Necessary
If your dog is particularly fidgety or resistant to having their nails trimmed, use gentle restraint to keep them in place. Avoid restraining them forcefully or causing them distress, as this can escalate the situation.
8. Take Breaks as Needed
If your dog becomes stressed or agitated during the nail trimming process, take breaks as needed to allow them to calm down. It’s better to take your time and ensure a positive experience than to rush through the grooming session.
Perfect Positioning: Setting Up for Nail Trimming Success with Your Dog
Guillotine Dog Nail Clippers, Guillotine Dog Nail Clippers
Proper positioning is key to a successful and stress-free nail trimming session for both you and your furry friend. By ensuring your dog is comfortable and secure, you’ll have better control and visibility, making the process smoother and safer. Here’s how to position yourself and your dog for nail trimming success:
1. Choose a Comfortable Surface
Select a stable and non-slip surface for grooming, such as a table, countertop, or non-skid mat on the floor. Avoid surfaces that are too high or too low, as they can cause discomfort for both you and your dog.
2. Sit or Kneel Beside Your Dog
Position yourself next to your dog, either sitting or kneeling at their level. This allows you to maintain eye contact and provide reassurance throughout the grooming process.
3. Secure Your Dog’s Position
Gently but firmly hold your dog in place to prevent them from squirming or attempting to escape. You can place one hand on their back or chest to keep them steady while you work on their nails.
4. Lift and Support Each Paw
Lift one of your dog’s paws and hold it securely in your hand. Use your other hand to support the underside of the paw, ensuring it stays steady and comfortable throughout the trimming process.
5. Maintain a Relaxed Grip
Avoid gripping your dog’s paw too tightly, as this can cause discomfort and make them more anxious. Instead, maintain a relaxed but firm grip to keep their paw secure without causing undue stress.
6. Provide Positive Reinforcement
Throughout the positioning process, offer your dog plenty of praise, treats, and affection to reinforce calm and cooperative behavior. This will help them feel more at ease and make the experience more enjoyable for both of you.
7. Take Breaks as Needed
If your dog becomes restless or uncomfortable during the grooming session, don’t hesitate to take breaks as needed. This allows your dog to relax and regroup before continuing with the nail trimming process.
Examining Your Dog’s Nails: A Step-by-Step Guide for a Thorough Inspection
Before diving into the nail trimming process, it’s essential to examine your dog’s nails carefully. By assessing the condition of their nails and identifying any potential issues, you can ensure a safe and effective grooming session. Here’s a step-by-step guide to examining your dog’s nails:
1. Choose a Well-Lit Area
Select a well-lit area for nail examination, preferably with natural light or a bright overhead light source. Adequate lighting will help you see the details of your dog’s nails more clearly.
2. Sit or Kneel Beside Your Dog
Position yourself next to your dog, either sitting or kneeling at their level. This allows you to maintain eye contact and keep them calm and relaxed during the examination.
3. Lift Each Paw Gently
Starting with one paw at a time, gently lift your dog’s paw and hold it securely in your hand. Use your other hand to support the underside of the paw, keeping it steady and comfortable.
4. Inspect Each Nail Carefully
Examine each nail individually, looking for the following:
- Length: Check the length of each nail to determine if it needs trimming. Overgrown nails can cause discomfort and affect your dog’s mobility.
- Shape: Look at the shape of the nail tip. Ideally, nails should be smooth and rounded. Sharp or jagged edges may indicate the need for trimming.
- Color: Note the color of the nail and the surrounding tissue. Healthy nails should be translucent or white, with a pinkish area called the quick visible inside. Dark spots or discoloration may indicate injury or infection.
- Texture: Feel the texture of the nail surface. Healthy nails should be smooth and hard. Brittle or flaky nails may be a sign of underlying health issues.
5. Check for Signs of Injury or Infection
Inspect the nail and surrounding tissue for any signs of injury or infection, such as:
- Swelling
- Redness
- Discharge
- Bleeding
- Pus
- Foul odor
If you observe any of these symptoms, it’s advisable to seek veterinary guidance for thorough evaluation and appropriate treatment.
6. Take Note of Your Findings
Make a mental note or jot down any observations about your dog’s nails, including their length, condition, and any abnormalities you may have noticed. This information will help guide your nail trimming process and provide valuable insights for future grooming sessions.
Trim with Confidence: Mastering the Art of Dog Nail Clipping
Are you ready to tackle the task of trimming your dog’s nails with confidence? With the right tools, techniques, and mindset, you can become a pro at keeping your furry friend’s nails neat and tidy. Here’s a step-by-step guide to trimming your dog’s nails like a seasoned professional:
Guillotine Dog Nail Clippers, Guillotine Dog Nail Clippers
1. Gather Your Supplies
Prior to starting, assemble all required supplies, including:
- Guillotine-style nail clippers
- Styptic powder or gel (for stopping bleeding)
- Treats for positive reinforcement
- Towel or mat for stability
- Optional: Nail file or Dremel for smoothing rough edges
2. Prepare Your Guillotine Dog Nail Clippers
Create a calm and comfortable environment for grooming. Practice desensitization techniques to familiarize your dog with the nail clippers and handling of their paws. Provide ample treats and praise to reinforce positive behavior throughout.
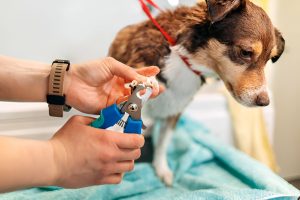
3. Position Yourself and Your Dog
Choose a stable surface for grooming and sit or kneel beside your dog. Lift and support each paw gently, ensuring your dog feels secure and relaxed throughout the process.
4. Examine the Nails
Inspect each nail carefully, noting the length, shape, color, and texture. Look for signs of injury or infection, and make a mental note of any abnormalities that may require attention.
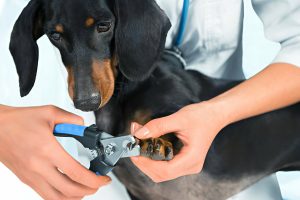
5. Determine the Cutting Point
Identify the quick—the pinkish area within the nail that contains blood vessels and nerves. Aim to trim just below the quick to avoid causing discomfort or bleeding. Err on the side of caution, especially with dark-colored nails where the quick may be less visible.
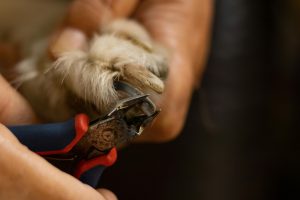
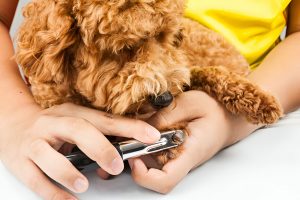
6. Trim with Confidence
Position the guillotine clippers around the nail, just below the desired cutting point. Gently squeeze the handles to make the blades come together, cutting off the tip of the nail in one smooth motion. Steer clear of trimming too close to the quick to avoid accidental injury.
7. Monitor for Bleeding
If you accidentally cut the quick and there is bleeding, apply styptic powder or gel to the affected nail to stop the bleeding. Keep a close eye on the nail and provide gentle pressure if necessary until the bleeding stops.
8. Reward and Repeat
Immediately after trimming each nail, praise your dog and offer them a treat as a reward for their cooperation. Continue trimming the nails on all four paws, taking breaks as needed to ensure both you and your dog remain calm and comfortable.
Monitoring for Bleeding: Essential Steps After Trimming Your Dog’s Nails
After trimming your dog’s nails, it’s crucial to monitor for any signs of bleeding, especially if you accidentally cut the quick—the sensitive blood vessel inside the nail. Here’s a step-by-step guide to help you handle any bleeding and ensure a safe and comfortable grooming experience for your furry friend:
1. Stay Calm and Reassure Your Dog
If you notice any bleeding after trimming your dog’s nails, it’s essential to stay calm and reassure your pup. Dogs can pick up on their owner’s emotions, so remaining calm will help keep them relaxed during this time.
2. Apply Pressure to the Nail
Following trimming, if bleeding occurs, apply gentle pressure using a clean cloth or cotton ball. This will help stem the flow of blood and encourage clotting. Hold the pressure for a few minutes to allow the blood to coagulate.
3. Use Styptic Powder or Gel
If the bleeding persists or is more than a minor bleed, apply styptic powder or gel to the affected nail. Styptic powder contains ingredients that help constrict blood vessels and promote clotting, effectively stopping the bleeding. Dip the bleeding nail into the styptic powder or apply it directly to the nail with a cotton swab.
4. Monitor for Signs of Discomfort
Monitor your dog closely for any signs of discomfort or distress. Some dogs may experience pain or sensitivity after nail trimming, especially if the quick has been cut. If your dog shows signs of pain, such as limping or licking the affected paw, contact your veterinarian for further guidance.
5. Provide Comfort and Distraction
Offer your dog comfort and distraction during this time by providing treats, affection, or engaging in a favorite activity. This will help take their mind off any discomfort and reinforce positive associations with nail trimming.
6. Prevent Re-Injury
To prevent re-injury and further bleeding, avoid activities that could put pressure on the affected nail, such as running or rough play. Keep your dog calm and relaxed until the bleeding has stopped completely.
7. Follow Up with Your Veterinarian if Necessary
If the bleeding persists or if you’re unsure how to handle the situation, don’t hesitate to contact your veterinarian for further guidance. They can provide additional support and treatment options to ensure your dog’s safety and well-being.
Repeat and Reward: Reinforcing Positive Behavior During Guillotine Dog Nail Clippers Trimming
Consistency and positive reinforcement are key when it comes to trimming your dog’s nails. By repeating the process regularly and rewarding your furry friend for their cooperation, you can turn nail trimming into a stress-free and enjoyable experience for both of you. Here’s how to repeat and reward during the nail trimming process:
1. Repeat the Nail Trimming Process
Consistency is key when it comes to maintaining your dog’s nail health. Aim to trim your dog’s nails every 2-4 weeks, depending on their growth rate and activity level. Regular trimming helps prevent overgrowth and minimizes the risk of discomfort or injury.
2. Establish a Routine
Set a regular schedule for nail trimming to help your dog become accustomed to the process. Whether it’s once a week or once a month, stick to the routine to create a sense of predictability and familiarity for your furry friend.
3. Reward Calm Behavior
Throughout the nail trimming process, offer plenty of praise, treats, and affection to reinforce calm and cooperative behavior. Reward your dog for allowing you to handle their paws, for remaining still during trimming, and for overall good behavior.
4. Take Breaks as Needed
If your dog becomes restless or anxious during nail trimming, don’t hesitate to take breaks as needed. This allows your dog to relax and regroup before continuing with the grooming session. Use this time to offer reassurance and additional treats.
5. Practice Desensitization
Gradually desensitize your dog to the nail trimming process by incorporating handling and touching of their paws into daily activities. Use positive reinforcement to create positive associations with paw handling and grooming tools.
6. Be Patient and Gentle
Patience is key when it comes to grooming your dog’s nails. Approach the process with a calm and gentle demeanor, and avoid rushing or forcing your dog to comply. Remember, building trust takes time, so be patient and understanding throughout the process.
7. End on a Positive Note
After completing the nail trimming session, end on a positive note by offering your dog plenty of praise, treats, and affection. This reinforces the idea that nail trimming is a positive and rewarding experience, making them more likely to cooperate in the future.
Finish with a Smooth Edge: Polishing Your Guillotine Dog Nail Clippers for Comfort and Style
Once you’ve trimmed your dog’s nails to the desired length, it’s time to put the finishing touches on their manicure by smoothing out any rough edges. This not only ensures your furry friend’s comfort but also adds a touch of style to their pawdicure. Here’s how to finish with a smooth edge:
Guillotine Dog Nail Clippers, Guillotine Dog Nail Clippers
1. Gather Your Supplies
Before beginning the smoothing process, gather the following supplies:
- Nail file or Dremel tool
- Towel or mat for stability
- Treats for positive reinforcement
2. Choose Your Tool
Decide whether you prefer to use a nail file or a Dremel tool for smoothing your dog’s nails. A nail file offers precise control and is suitable for dogs who are comfortable with handling, while a Dremel tool provides quick and efficient smoothing but may be noisier and require more acclimation for your dog.
3. Position Yourself and Your Dog
Sit or kneel beside your dog on a stable surface and lift one paw at a time. Ensure your dog feels secure and relaxed, and provide plenty of praise and treats for positive reinforcement.
4. Smooth the Nail Edges
Using the nail file or Dremel tool, gently smooth out any rough edges or sharp points left after trimming. Work in small, gentle motions, taking care not to apply too much pressure or overheat the nail.
5. Check for Comfort
After smoothing each nail, run your finger along the edge to ensure it feels smooth to the touch. Pay attention to your dog’s reaction—if they flinch or pull away, adjust your technique or take a break to prevent discomfort.
6. Reward and Repeat
Throughout the smoothing process, continue to offer praise and treats to reinforce positive behavior. Take breaks as needed to keep your dog comfortable and engaged, and repeat the process for each nail until all are smooth and rounded.
7. End on a Positive Note
Once you’ve finished smoothing your dog’s nails, end the grooming session on a positive note by offering plenty of praise, treats, and affection. This reinforces the idea that grooming is a positive and rewarding experience for your furry friend, Guillotine Dog Nail Clippers.


